

The biggest day in your standing seam metal roof’s life is the day it’s installed. Obviously, you want it done correctly.
However, metal roofing installation is much more complex than normal shingles. The last thing you want is to invest in an expensive standing seam metal roof just to have it fail due to improper installation.
Whether you’re thinking of doing it yourself or hiring a professional, following the correct installation steps is crucial.
For over 30 years, the team at Bill Ragan Roofing has helped homeowners understand every step of the roof replacement and installation process. Because of this, I’ll break down how to install a standing seam metal roof.
This article covers the following:
- What materials are needed for a standing seam metal roof installation?
- 7 steps to install a standing seam metal roof
What materials are needed for a standing seam metal roof installation?
A standing seam metal roof system is a series of metal panels locked together at the seams with fasteners underneath the panels. Unlike an exposed fastener metal roof, this allows the panels to glide back and forth as the metal expands and contracts.
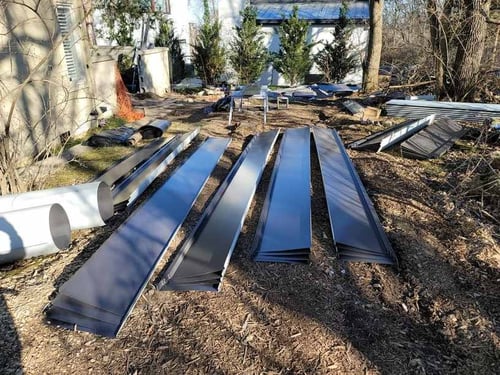 (Standing seam roofing materials before installation)
However, fasteners and metal panels aren’t the only materials a standing seam metal roof needs to be installed correctly. So, before we get to how it’s done, you need to know the materials required for the installation.
Your standing seam metal roof system is made up of the following materials:
- Roof decking: Roof decking (also called sheathing) is the wooden boards (plywood, OSB, plank) that make up the foundation of your standing seam metal roof system. The rest of the materials below are directly installed on the roof deck.
- Starter lock strip: Lock strips hold (lock) your standing seam metal panels down to your roof edges to keep them from flapping in the wind or blowing off completely.
- Underlayment: Underlayment is usually a felt (15 lb. or 30 lb.) or synthetic material installed over roof decking for additional protection. For your standing seam metal roof, your underlayment must be a self-adhering, high-heat ice and water shield.
- Metal panels: The actual metal material and top layer of a standing seam metal roof system, with multiple metal types and colors to choose from.
- Clips: Unseen fasteners that connect the panels and hold them down to the roof deck.
- Z bar: Metal flashing that connects the metal panels to ridge capping.
- Ridge capping: Metal installed at the peak where two roof slopes meet to close the standing seam metal roof at the top.
7 steps to install a standing seam metal roof
Now that you know what materials, you’re ready to learn how they come together during installation to form a standing seam metal roof system. Below are the 7 steps to install a standing seam metal roof.
1. Tear off your old roofing materials
Before installing your standing seam metal roof, the old roofing materials need to be torn off to get to a clean deck. The roofers will start tearing off at the furthest corner away from your driveway and gradually moving towards the dump trailer.
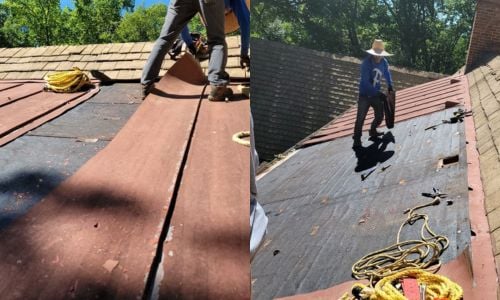
While most are tearing off, others make sure all the debris gets off the roof and into the dump trailer or tarped landing zone. There should also be a couple crew members on the ground to catch anything that got away or missed the dump zone.
2. Replace compromised roof decking
After tearing off a section, your roof decking will be inspected for rotting, broken, or compromised wooden boards. Any damaged decking must be replaced before your standing seam metal roof installation can begin.
-1.jpg?width=500&height=391&name=DeckingRotten%20(2)-1.jpg) (Example of rotten decking that needs to be replaced)
(Example of rotten decking that needs to be replaced)
Some wooden boards usually need to be replaced, but it’s rare to need entire sections or the full roof deck replaced. However, you won’t know the full extent until your old roof is completely torn off.
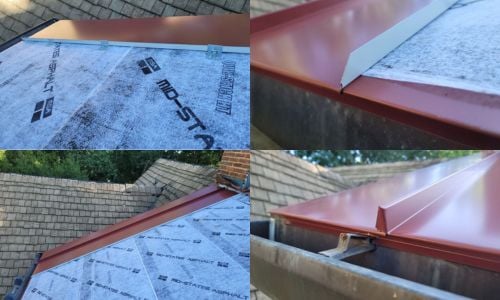
3. Install lock strips at the rakes and eaves
Now that you have a stable roof decking, lock strips are installed at the eaves (the bottom edge of your roof) and rakes (the slanting edge of your roof).
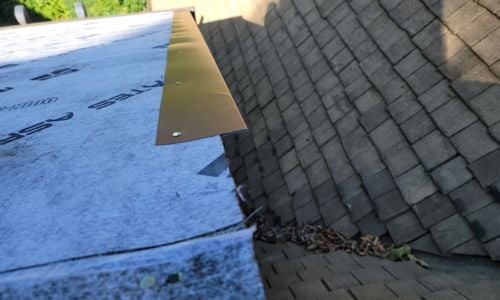
Remember, this is to ensure the metal panels on the edge are held down to prevent wind and water from getting underneath.
4. Install high-heat ice and water shield on the decking
Once the lock strips are installed on the rakes and eaves, underlayment (high-heat ice and water shield) is installed over the decking. The high-heat ice and water shield’s cotton-like fibers prevent it from sticking to the metal panels as they expand and contract.
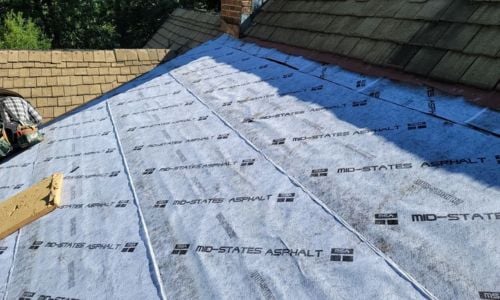
The underlayment must be installed over the top of the lock strip at the eaves and underneath at the rakes. Failing to do so creates condensation under the ribs, which will run down the fascia board behind the lock strip at the eaves and eventually rot it out.
5. Install your standing seam metal panels
With everything else in place, it’s time to start installing the standing seam metal panels. Before beginning, it’s important to cut the panels at the rib on the bottom so they can attach to the lock strips at the eaves.
With the metal panels prepared, installation begins by cutting the rib off the first panel and hooking it onto the lock strip at the rakes. Once the first panel is locked on, the next panel attaches to it with clips at the ribs and gets fastened to the lock strip at the eaves.
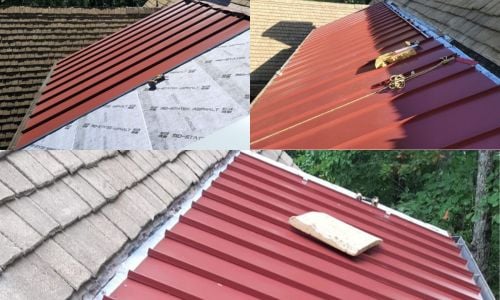
Going forward, clips are installed on the vertical part of the seam on each panel with 2 gimlet screws. After installing the clips on the panel, the next metal panel snaps on to fasten it.
This process of fastening the metal panels together continues until you reach the other lock strip on the rakes and finally fastening the last panel to the edges.
6. Install a Z bar to fill in gaps
After the metal panels are installed, the Z bar is installed to fill in spots between the ribs of the metal panels and the roof ridge. The metal is bent in the shape a Z to ensure it’s slightly taller (usually a 1/8th of an inch) than the ribs.
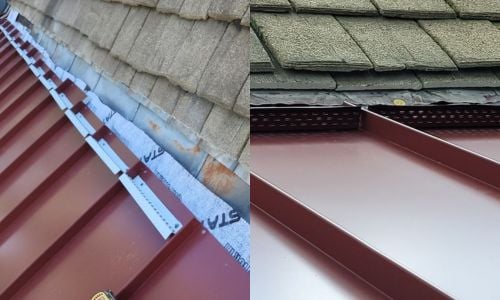
This prevents water from getting through gaps at the top of your roof or where the metal transitions.
7. Lock the ridge capping into the Z bar
Once the Z bar is installed, the metal panels will be locked into the ridge capping to close the metal roof. If you have areas where panels are coming from a low slope roof to a steeper slope, you’ll need transition metal instead of ridge capping.
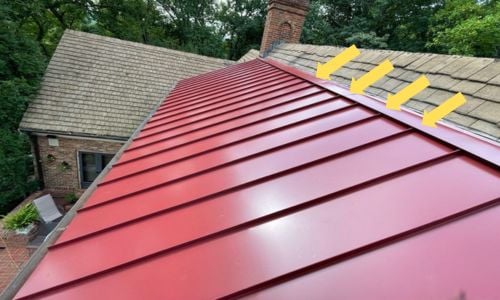 (Transition metal used on the example)
In these areas, the transition metal will come out 6 inches to create a straight plane all the way across before locking onto a Z bar. Once your ridge capping or transition metal is installed, your new standing seam metal roof is installed and ready to last for decades.
How expensive is a standing seam metal roof installation by a professional roofer?
Now you know the steps to installing a standing seam metal roof. Although the process seems easy on paper, it’s actually pretty complex.
In fact, it’s a completely different specialty than normal asphalt shingle that requires plenty of experience and specific skills to do correctly. Metal roofing should always be left to professionals instead of a DIY project, no matter the roof size.
However, getting a professional standing seam metal roof installation won’t be cheap. In fact, the biggest reason homeowners turn away from metal roofing is due to cost.
To help you determine if it’s in your budget, I wrote another article breaking down how much a standing costs to install.
Check out How Much a Standing Seam Metal Roof Costs to learn if it’s the right roofing material for your roof replacement budget.
